Khimar Pattern for Sewing Basic Khimar

Thinking of making your own khimar? Here we provide khimar pattern with easy to follow instructions and diagram for you to start your sewing basic khimar project.
One of the good thing of making your own khimar is that you could decide the length of your khimar that you want, the style of your khimar – round khimar; short at the front, long at the rear; khimar with wrist cuff.
If you're a novice in sewing like me, this step by step instructions with simple diagram are handy for you to make a start.
How to make basic khimar
- Buy 2.5m (3 yards) length x 115cm (45”) width of material. This would give you khimar length from wrist to fingertip, depending on your height.
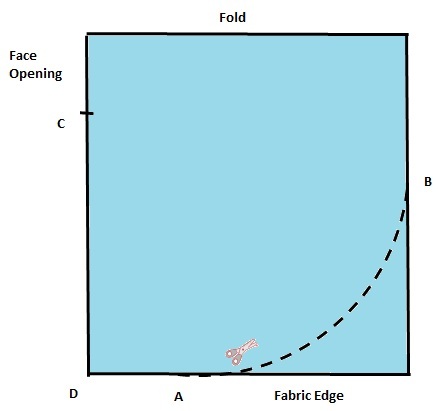
- Fold in half width wise. Use pins to hold the material together.
- Cut a large curve from A to B (refer to the diagram)
- Measure the circumference of your face from the top of your head to the point under your chin. Use this measurement to mark point C on the material
- Sew the front of the khimar from point C to D and leave the rest open for the face
- Hem the lower edge and face opening as you like
Tips and ideas
- For a beginner in sewing cotton material works the best as it is not slippery to handle
- If you want your khimar to be longer you could buy wider width material like 60”
- For longer at the back and shorter at the front khimar, cut the material a little higher than point D (may be 5” from point D) and make a large smooth curve towards point B
- Hemming could be tricky if you’re a beginner especially to the edge of the khimar, for easy hemming use small width lace of similar colour, not too fancy lace
- After sewing the front of the khimar, try it on. The face opening may need adjusting depending on the fitting your desire
- If you want to wear khimar with underscarf, you could buy the readymade underscarf or make your own underscarf.
Return from Khimar Pattern to The Best Islamic Clothing Homepage
Comments


New! Comments
Have your say about what you just read! Leave me a comment in the box below.